Friday, March 29, 2024
Monday, August 24, 2020
How to recover data from hard drive with bad sectors?
Overview on hard drive bad sectors and data recovery
What is a hard drive bad sector?
A damaged disk sector is called bad sector. A sector is the smallest storage unit on a hard drive, and there are thousands of sectors on a hard disk drive. These sectors may get damaged due to a variety of reasons. As a consequence, files stored on these damaged sectors may get lost or become inaccessible. Bad sectors are not unusual on hard drive and other storage devices.
Bad sectors can be mainly divided into two types: physical bad sectors and logical bad sectors. Physical bad sectors are also called hard bad sectors, and they are caused by physical damages and cannot be repaired; whereas, logical bad sectors also known as soft bad sectors are caused by logical corruption, and they can be repaired.
What are symptoms when disk has bad sectors?
It is not difficult to know whether a hard drive contains bad sectors, for there are quite a few symptoms indicating a hard drive may develop bad sectors, for example:- It takes more time than usual to respond your actions,like launch a program, open a file, etc.
- Windows fails to boot or gets blue screen frequently.
- System reports "Windows detected a hard disk problem"
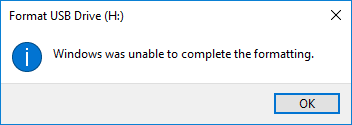
- System cannot format the disk and reports "Windows was unable to complete the format"
- Computer becomes slow or even freezes when connecting the disk.
- Partition turns to inaccessible or partitions gets lost
How can I recover data from hard drive that has bad sectors?
In many situations, data recovery is available when hard drive contains bad sectors. However, the recovery method should be chosen according to the bad sector actual state. When the hard drive contain few logical bad sectors, a professional data recovery program will be able to recover files; when data recovery software fails to scan the disk for lost data, you can try creating a sector-by-sector clone/image for the drive, so that you can perform hard drive recovery from destination drive or image file without scanning the damaged disk. If disk cloning or imaging cannot finish, you will have to send the disk to a data recovery company.Note: Bad sector repairing does nothing to help recover data, instead, the repairing destroys permanently. Hence, data recovery should be performed prior to repairing bad sectors.
Method 1: Recover data from hard drive with bad sectors via File Recovery
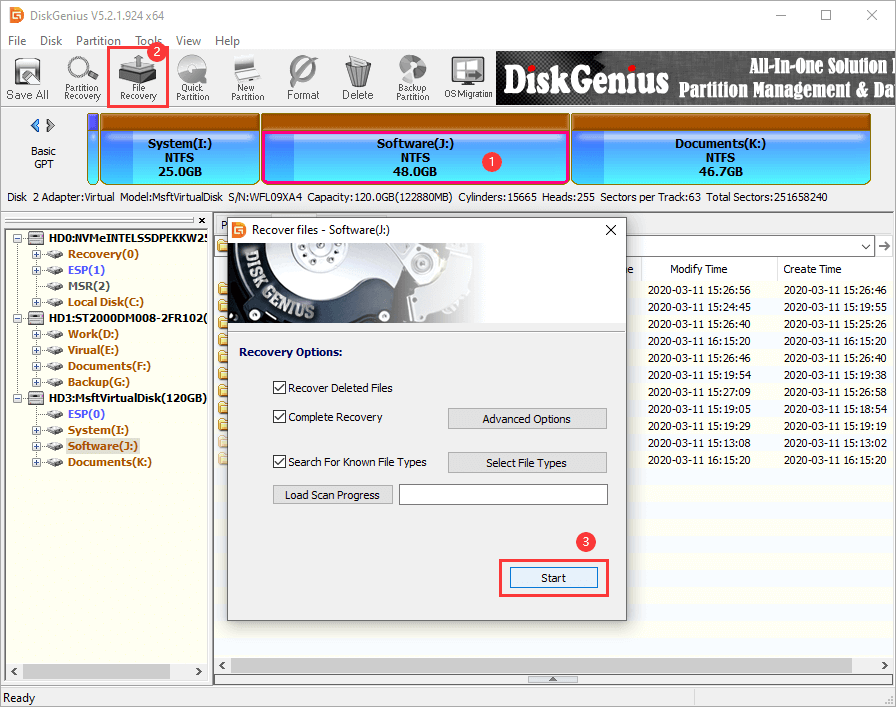
How can I recover data from hard drive with bad sectors? When a hard drive has bad sectors, partition may become inaccessible or get lost. On this occasion, you can perform file recovery or partition recovery with DiskGenius. If normal data recovery process cannot carry out, you can move to Method 2 to create an image for the hard drive and then recover data from image.Step 1 In DiskGenius, select the partition that loses data and click File Recovery button. After that, the Recover Files window pops up, and you need to click Start button to start scanning the partition.
Step 2 Wait for the scanning to complete.
The scanning speed will be slow when it encounters bad sectors, and you need to wait with patience. Make sure the hard drive is not used by other programs during the scanning. Tip: you can stop scanning in advance when wanted files are listed by the software.
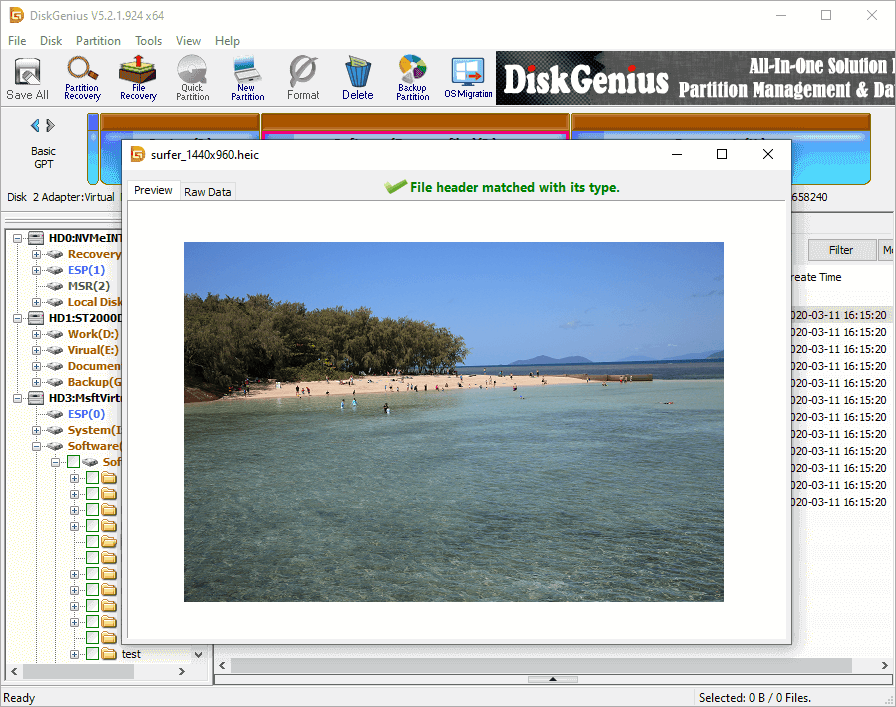
Step 3 Preview scanning result to check if wanted files are corrupted.
Double-click a file on the right pane, and you can view file content on pop-up window, as follows. By this way, you can check if lost files are corrupted.
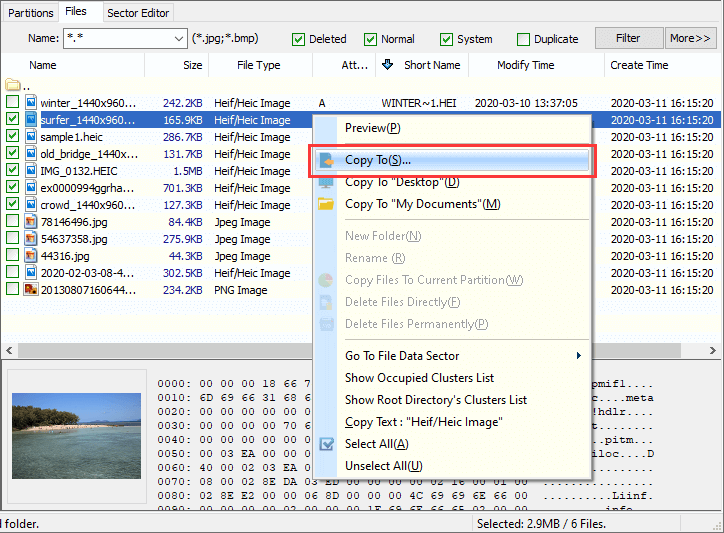
Step 4 Select files you want to recover, right-click on them and choose Copy To. After that, you will be prompted to set a location to store recovered data. Make sure recovered files are copied to a partition of another working disk.
Method 2: Clone disk with bad sectors and recover files from destination disk
When file recovery of Method 1 fails to work as expected due to serious bad sectors, the alternative solution is making a sector-by-sector clone for the hard drive and then recover lost data from the destination disk. The disk cloning process allows to skip bad sectors, and thus you won't be troubled by bad sectors when recovering data from the destination disk.Note:
- You need to prepare a working hard drive whose capacity should not be smaller than the original disk.
- Everything on the destination disk will be wiped during the disk cloning process.
- The function used here is available for DiskGenius Professional Edition.
Step 1 Launch DiskGenius, and click Tools > Copy Sectors, as follows:
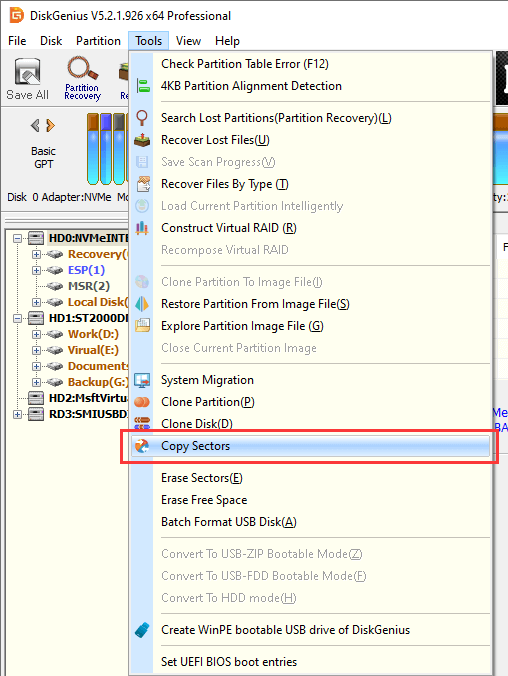 Now the Copy Sectors window opens.
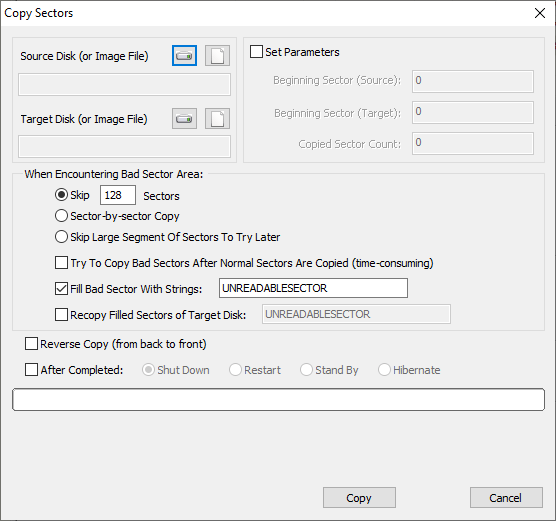
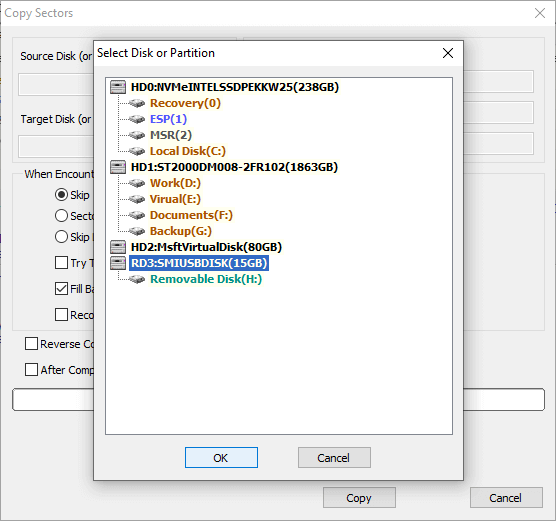
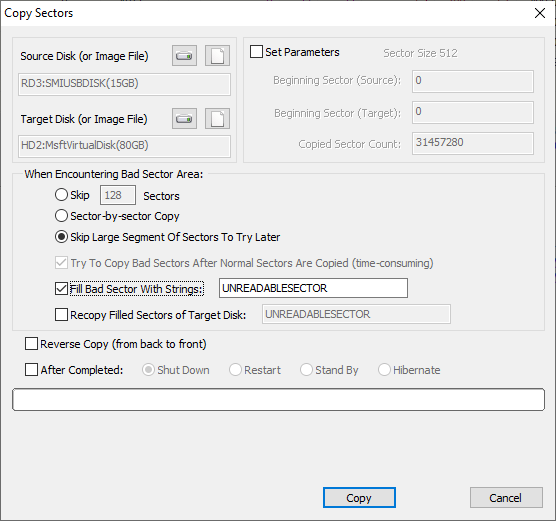
Step 2 Select source and destination disk.
Step 3 Configure settings and click Copy button to start.
You can set what to do when the cloning process encounter bad sectors, for example, skip specified number of sectors, fill bad sector's corresponding part on destination disk, etc.
The copy process may take long time if there are too many bad sectors or the disk capacity is very larger, wait with patience.
Step 4 After copy sector process completes, you can remove the hard drive that has bad sectors and then recover lost data by scanning the target disk. File Recovery function is the recommended function to recover lost data, and you can refer to steps in Method 1 to complete rest data recovery task.
Method 3: Contact a specialized data recovery company
Going to a data recovery company is the last resort, when your hard drive is in a very bad situation that the first two methods does not work, for example, it does not respond to your actions, all sectors on the drive are no longer readable, computer freezes after connecting the disk, or it does not show up in Disk Management, etc. Data recovery company is equipped with professional machines and technicians, and your hard drive will get a dedicated data recovery solution. If necessary, technician can open the disk in a dust-free lab and retrieve data from platters. There two disadvantages of this method: first, it usually costs much more money than purchasing data recovery software; second, the recovery process takes longer time, for a hard drive with bad sectors is slow to read or write data, and it usually requires complicated operations.How to check and repair bad sectors?
Disclaimer: Bad sector repairing destroys files stored on or near bad sectors, thus it is recommended to backup data in advance; system may not be able to boot if you repair bad sectors on system disk; not all bad sectors can be repaired by software, for example physical/hard bad sectors; it does not mean the disk won't develop bad sectors in the future after bad sectors get repaired, thus it is not advisable to store important data on this disk again.
DiskGenius Free edition provides the function to verify and repair bad sectors, and you can follow steps here to scan your disk for bad sectors as well as repair bad sectors after scanning.Step 1 Connect the hard drive that has bad sectors to computer and launch DiskGenius.
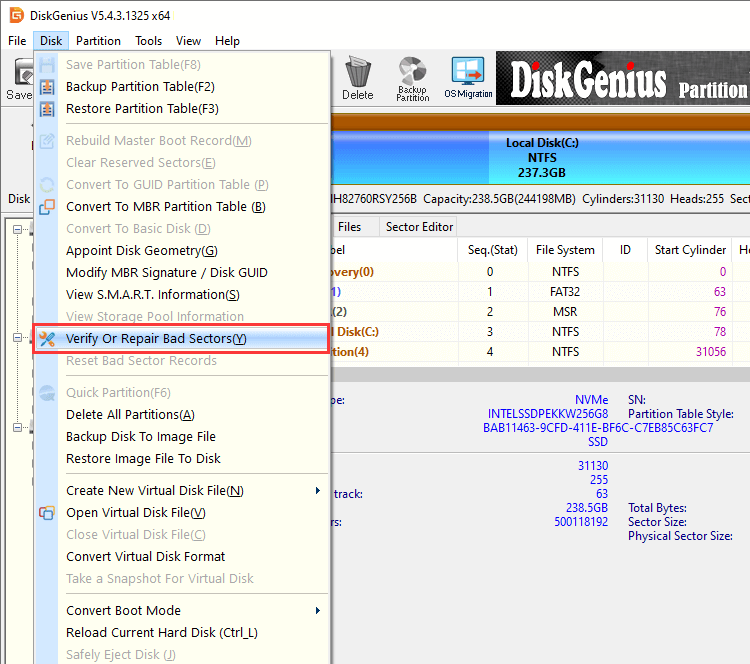
Note: if you want to check bad sectors for system disk (the disk where Windows is installed), it is suggested to boot to DiskGenius WinPE edition to scan the disk.Step 2 Select the hard drive in question and click Disk > Verify Or Repair Bad Sectors, as follows:
Step 3 After "Bad track verification" window shows up, you can click Start Verify button to start scanning the disk.
Tip: The red block labeled with "Damaged" indicates bad sectors; and "Severe" means it has the possibility to become bad sectors in the future.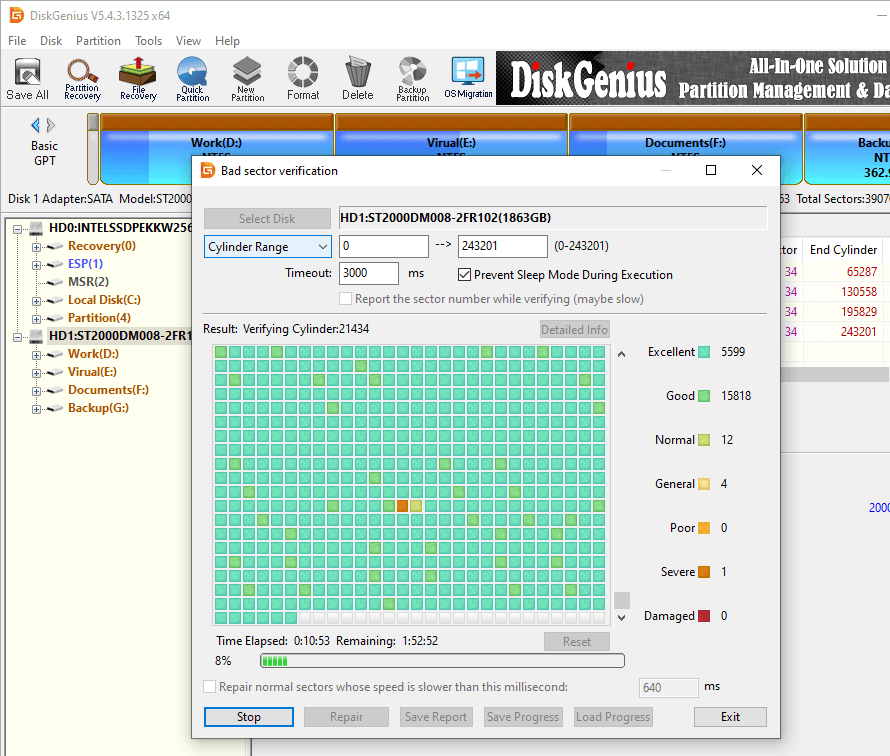 Wait for the scanning to complete, and you will receive a report when it gets finished. If the disk contains bad sectors, you can click Repair button to try repairing them.
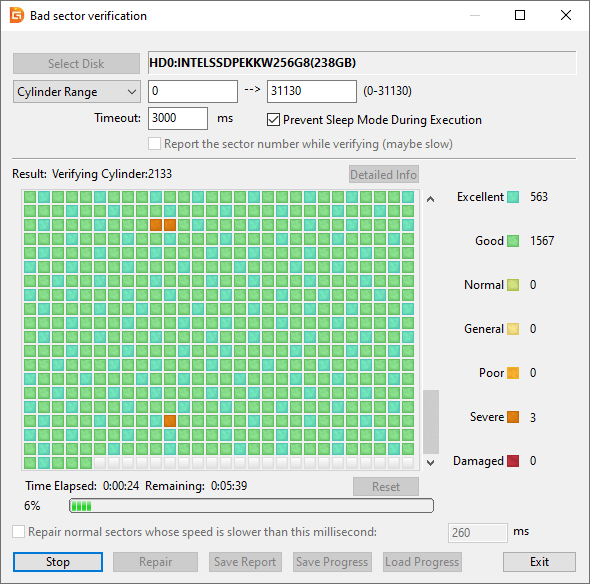
Tips to avoid hard drive bad sectors
There are quite a few factors that can cause bad sectors on your hard drive, and you need to pay attention to following aspects to avoid bad sectors whatever possible.
Invest in qualified hard drive. Try to purchase a good quality disk from well-known brands.
- Be gentle and careful when moving hard drive especially when the disk is connected to computer.
- Place hard drive in a proper environment which should not be too cold, hot, humid or dusty.
- Protect computer from sudden power failure or improper shut down.
- Click Safely Remove Hardware And Eject Media before remove hard drive when it is connected via USB port.
FAQs on recovering data from bad sectors
1. Can bad sectors on a hard drive be repaired?
Not all bad sectors can be repaired. Hard drive bad sectors can be physical bad sectors and logical bad sectors. A physical or hard bad sector indicates the sector is physically damaged, and it cannot be repaired. Whereas, logical/soft bad sectors stop working properly due to logical errors, and they can be repaired. DiskGenius is free bad sector repair software and you can free download it to check and repair bad sectors.2. Can you recover data from a damaged hard drive?
First you can try DiskGenius to recover data from damaged hard drive, for example, Load Current Partition Intelligently, Recover Lost Files or Copy Sectors to create sector-by-sector clone and recover data from destination drive. If the hard drive is damaged to an extent that software does not work, you will have to consider those expensive hard drive data recovery services.3. How do I recover data from unreadable hard drive?
By following steps below, you can easily retrieve files from unreadable/inaccessible/corrupted hard drives:Step 1: Connect the unreadable hard drive to a Windows computer and run DiskGenius.
Step 2: Select the unreadable drive in DiskGenius and Tools > Load Current Partition Intelligently.
Step 3: Then copy wanted files to another working hard drive.
4. How do I recover bad sectors on my external hard drive?
If your computer becomes slow to respond your actions after connecting an external hard drive with bad sectors, you can try cloning external hard drive to another working disk skipping bad sectors. DiskGenius supports to create sector-by-sector clone for disk. After that, you can try data recovery from destination disk without affecting original drive.
Step 1: Connect the external hard drive and a working disk to computer. Then launch DiskGenius.
Step 2: Click Tools > Copy Sectors to create a sector level disk cloning.
Step 3: Remove the damaged external hard drive and use File Recovery function to scan target disk and recover data.
5. What does recover bad sectors tool do?
A recover bad sector tool such as DiskGenius can help you recover lost data from hard drive or other storage devices that have bad sectors. DiskGenius provides multiple functions to help you handle hard drive recovery and bad sectors, for instance: view S.M.A.R.T. information, check and repair bad sectors, recover lost files and partition, clone disk via skipping bad sectors, create sector-by-sector clone, etc.6. How to fix bad sectors on external hard drive?
DiskGenius Free edition provides the function to check and repair bad sectors, and you can follow steps below to fix bad sectors on external hard drive:Step 1: Launch DiskGenius, select the external hard drive and click Disk > Verify Or Repair Bad Sectors.
Step 2: Click Start Verify button to scan the external hard drive and locate bad sectors.
Step 3: After scanning you can click Repair button to repair bad sectors.
Note: It is strongly recommended to backup files of the external hard drive before repairing bad sectors, for the repairing process will cause permanent damage to data stored on or near bad sectors.
Conclusion
In this article, we discussed hard drive bad sectors, including, how to recover data from bad sectors, create sector-by-sector clone for hard drive as well as how to check and repair bad sectors. When your hard drive develops bad sectors, you can follow solutions here to retrieve lost files from hard drive with bad sectors. In the end, it is recommended to keep your hard drive in a proper working environment to avoid bad sectors and attach importance to data backup. Should you have any questions regarding hard drive recovery or bad sectors, feel free to contact us please.More guides
- How to clone hard drive with bad sectors and recover data?
- Corrupted hard drive recovery: How to recover data from corrupted hard drive?
- How to recover files from corrupted external hard drive without formatting?
- How to recover data from crashed internal hard disk of laptop and desktop in Windows 10/8/7?
How to Fix "Windows Was Unable to Complete the Format" error?
The "Windows was unable to complete the format" error
Symptoms of the error
The "Windows was unable to complete the format" error appears when you try to format a partition of USB drive, memory card, external HDD, etc, after right clicking the drive in Windows File Explorer to format it. This error blocks you from formatting the partition, deleting everything quickly, repairing corrupted file system (RAW drive), changing the file system type (e.g. convert FAT32 to exFAT), etc.
Generally, partition formatting is very simple and takes only a couple of seconds to complete in Windows. Right-click on the drive you want to format, select "Format" button, and then click "Start" button. After formatting finishes, you will get a message saying, "Format complete". However, from time to time, Windows cannot complete the format for your USB flash drive, memory SD card or even hard drive, and reports following error message:
Example:
"I am trying to format a memory SD card on my Windows 10 x64 laptop, but the formatting cannot be completed. The SD card is connected via a card reader, and its drive letter in Windows File Explorer is G: When I tried to open it I received an error message 'You need to format the disk in drive F: before you can use it. Do you want to format it?' I click the 'Format disk' button, as photos on this memory card had been backed up. However, Windows was unable to format the SD card. Now, the SD card is labeled as RAW in Disk Management. Does that mean it is totally damaged? Is there any possibility to force format it or repair it? Any suggestion will be appreciated. Thanks in advance."
What causes the Windows unable to format error?
Although error message reported by Windows when the formatting cannot be completed reveals too simple information, there could be a variety of reasons behind this error. Here we list the most common causes:
- Lack of permissions: sometimes the administrator access is needed on your computer so as to complete the format. This can be easily fixed by formatting the disk via Command Prompt or Disk Management.
- Virus/malware: Virus/malware is not strange to computer users, as it can cause serious harm to both individuals and businesses. Should your device infect a virus or malware, your private data could be stolen or compromised, data got destroyed, hardware completely fried, etc. Every time you connect SD card, USB drive or other device to computer whose antivirus is not enabled, it is likely to infect a virus.
- Bad sectors: A bad sector refers to a sector on a storage device that gets damaged and does not respond to read or write requests. Bad sectors can occur on all kinds of devices, such as traditional hard drive, SSD, USB flash drive, memory card, pen drive micro SD card, etc. Once the drive contains bad sectors, the formatting cannot be completed in Windows.
- Write-protection: The write-protection usually means the mechanism that prevents users from making changes to the drive, for example, formatting, deleting data, etc. There are usually two types of protections on SD card / flash drive, the hardware-based and software-based. The formatting is unable to complete as long as the write protecting is enabled.
- Physical damages: Removable disks are more likely to get physical damaged compared with internal hard drive, for example, you may drop it down to the floor, never handle it with care, do not place it in a favorable environment, etc. If your storage device is physically damaged, you cannot fix it via solutions in this article.
7 solutions to fix "Windows was unable to complete the format" error on SD card, USB flash drive or hard drive
The content in this section includes 7 solutions to help you remove the Windows unable to formatting error on your memory card, USB drive, pen drive, hard disk, SD card, external HDD, etc. Since the cause of this error differs from one to another, the solution won't be the same. Thus, one solution that works on your case may not work on others. You can choose the solution based on your situation.
Note:
- Before trying following solutions, please confirm that files stored on the drive have been backed up, as these solutions may cause further damage to data stored inside the drive. If not, you should perform data recovery to get back important files from this inaccessible partition.
- If you happen to have access to another computer, try connecting the drive that cannot be formatted by Windows to that computer and check if the formatting can be completed. There might be times when the drive has completability issue with some PC. If this does not help, refer to following solutions.
- Though there are multiple solutions to fix this Windows unable to format error, these solutions do not work on all situations, for example, your storage device gets badly physical damages. In that case, you need to contact the manufacturer to seek help.
Solution 1: Format partition in Windows Disk Management
Disk Management is a built-in tool in Windows, and it is provided to help users manage disks and partitions attached to computer. Now you can try formatting the partition in Disk Management:
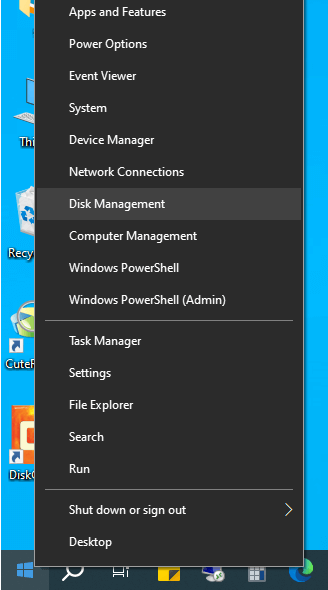
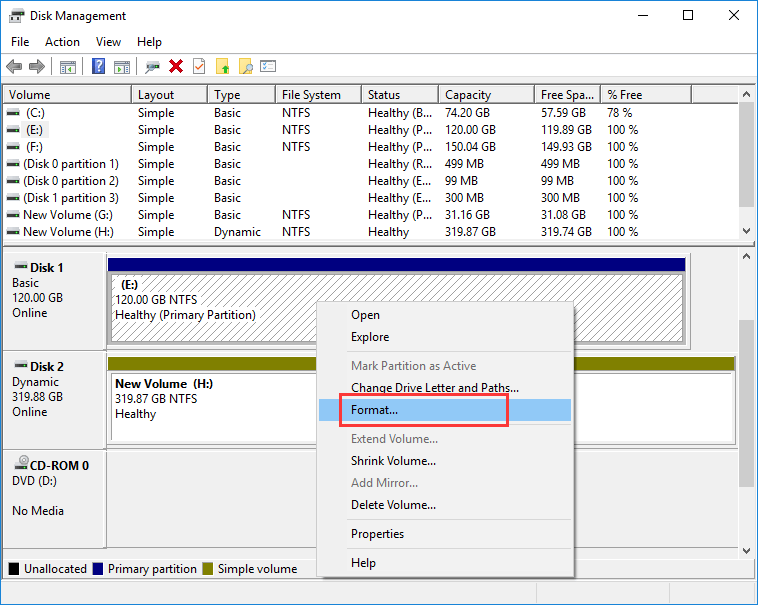
Step 1 Launch Disk Management. Right-click on Windows Start menu and select Disk Management, as follows:
Step 2 Choose the partition you want to format, right-click it and select Format option. Then click Yes when Windows prompts all data on the partition will be lost.
Step 3 Select a file system type you need, check the "Perform a quick format" option and click OK button.
Another message box will pop up, telling formatting this volume will erase all data on it and prompting to backup data you want to keep before formatting. Click OK button and Windows starts to format the partition at once.
Solution 2: Format the drive with free partition manager software DiskGenius Free Edition
DiskGenius Free is free partition manager software and it provides all sorts of functions regarding managing disk partitions in Windows 10/8/7/Vista/XP. With DiskGenius Free edition, you can format, create, delete, resize, hide, resize, extend, split, image, clone partition, partition hard drive, clone disk, wipe disk/partition permanently, check and repair bad sectors, convert disks between MBR and GPT, manage UEFI boot entries, create WinPE bootable USB disk, etc. Here is how to format a partition in DiskGenius.
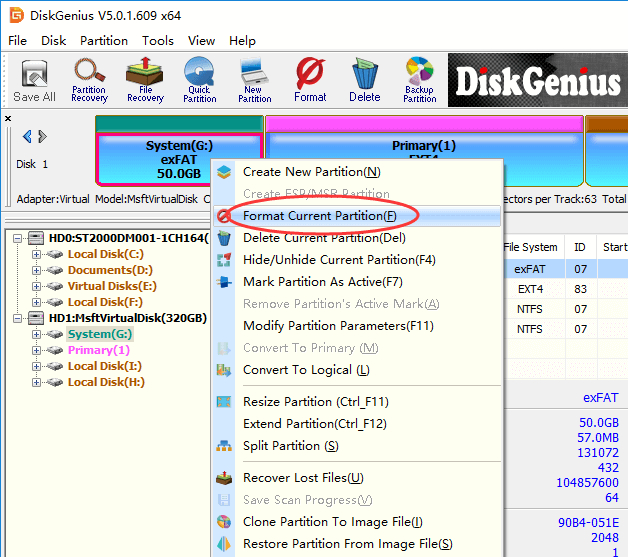
Step 1 Free download, install and launch DiskGenius Free edition on your computer. Right-click on the partition to be formatted, and select Format Current Partition from context menu, as below:
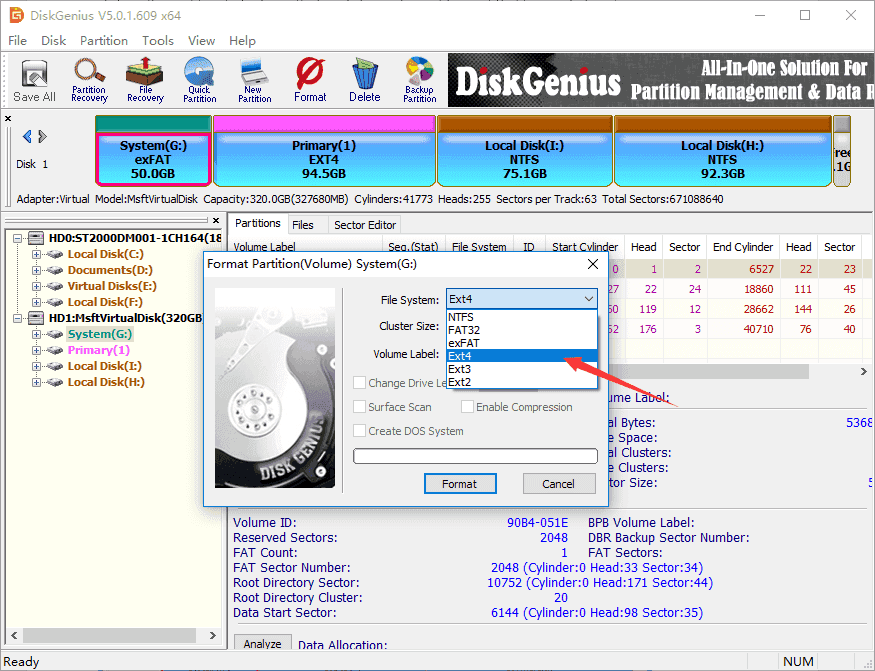
Step 2 Select a file system type from the dropdown list and click Format button.
DiskGenius supports to format a partition to NTFS, FAT32, exFAT, EXT4, EXT3 and EXT2 file system, and you can choose one in line with your requirements.
Step 3 Click Yes when the software asks to confirm the operation.
Solution 3: Complete the format via Diskpart
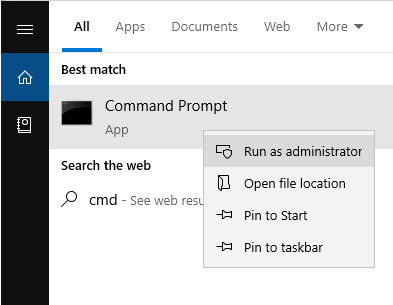
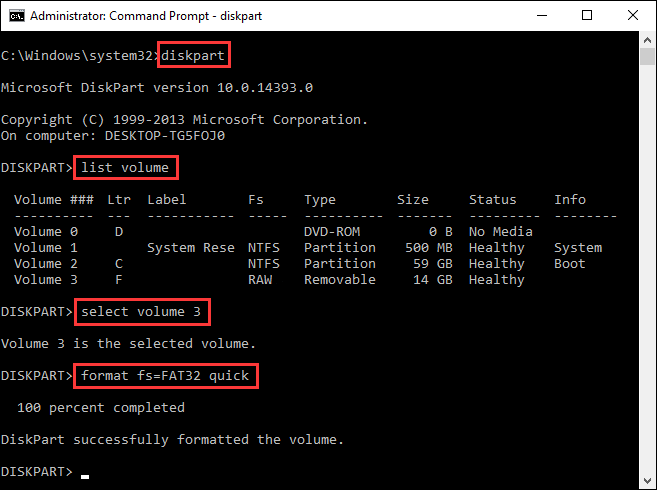
Step 1 Launch Command Prompt as administrators.
Type cmd in Windows searching box to find out Command Prompt, right-click it and choose Run as administrator, as the picture below:
Step 2 Type diskpart in Command Prompt and press Enter key.
Step 3 Now continue executing following command to complete the format. Remember to hit Enter key after each command.
List volume
Select volume 3 (replace 3 with the number of the volume you are going to format)
Format fs=FAT32 quick (you can replace FAT32 with NTFS, exFAT, etc. if you want to format the partition to other file system.)
Solution 4: Clean up virus/malware
Removable storage devices are not produced with any anti-virus software, and they can infect virus when they are used on computers that are not protected by anti-virus software. When you cannot format the device, you can run an anti-virus scan for the device to clean up all possible virus and malware.
Some third-party anti-virus software can run an automatic scan for inserted disk, and thus is not recommended to disable antivirus software before connecting external drive. If you have not installed any anti-virus software, you can simply enable Windows Defender which also works well in most situations.
Solution 5: Remove the write protection
Write protection is usually the issue of SD card and USB drive. Some memory cards and USB flash drives are produced with a physical write-protection switch. If the switch is placed to the LOCK (ON) side, the drive is write-protected. In that case, you can neither formatting the drive nor making other changes. So you need to ensure the switch is put to UNLOCK (OFF) position to remove write protection. If the removable disk does not have such a switch, you can refer to this guide to remove write protection: How to fix "The disk is write protected" error on USB drives?
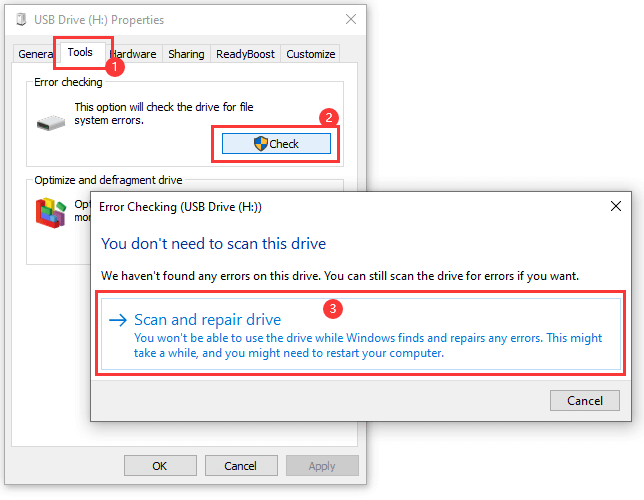
Solution 6: Check and repair errors for the drive
Disk checking is another useful utility provided by Windows, and it can help users to check the drive for file system errors. Follow steps here to run a disk check for the drive:
Step 1 Right-click the partition that Windows cannot format and select Properties option.
Step 2 Select Tools tab and click Check button under error checking. Then click Scan and repair drive on pop-up window, and wait for the process to finish.
Note: you won't be able to use the drive while Windows finds and repairs any errors. This might take a while, and you might need to restart your computer.
Solution 7: Check and repair bad sectors for the disk
Bad sector is one of the major causes of "Windows was unable to complete the format" error, and you can have a check for your disk to see if it contains bad sectors with DiskGenius Free Edition. Moreover, you can try repairing bad sectors if the scanning reports the disk have bad sectors.
Note: Bad sector repairing is not helpful for data recovery, instead, it may cause further damage to data. Hence, it is suggested to back up files before repairing bad sectors.
Step 1 Select the disk you want to check bad sectors and click Tools > Verify Or Repair Bad Sectors, as follows:
Step 2 Click Start Repair button, and DiskGenius starts to scan the disk to verify if there are bad sectors.
Tip: Close all programs that are accessing the disk and do not access the disk during the scanning in order to get an accurate result.
How to recover lost data when Windows was unable to complete the format SD card, USB or hard drive?
How to recover data from USB drive, SD card, hard drive or pen drive when it is not accessible? It is a common occurrence that partition turns to RAW before we can back up files in it. No worries, it is not that complicated to recover lost files. You can try DiskGenius to perform RAW partition recovery, recover files from formatted/unformatted partition, recover deleted files, restore lost partition, etc.
Step 1 Select the partition where lost files were stored, click File Recovery and click Start button. After that, DiskGenius starts to search for lost data. Wait for the scanning to complete.
Step 2 Preview files to check if lost files are recoverable.
File preview is allowed during and after scanning, and it helps to verify if lost files can be recovered correctly. It happens that lost files got damaged after data loss, and thus you need to preview files to make sure if wanted files are corrupted.
Step 3 Copy files to another partition to complete the recovery: select data > right-click to choose Copy To.
FAQs on Windows unable to format
1. What is unable to complete the format?
It refers to the error message reported by system when Windows fails to format a drive. The error can be caused by many factors, for example, virus, bad sectors, write protection, disk physical damages, etc. You can follow solutions mentioned above to get this error fixed.
2. How do I fix my flash drive unable to format?
To complete the formatting of USB flash drive, you can follow steps below:
Step 1: Connect the flash drive to your PC. Then open Disk Management.
Step 2: Right-click on the flash drive in Disk Management and select Format option.
Step 3: Choose a suitable file system type and click OK button.
3. Why can't I format my USB?
When it comes to reasons why USB cannot be formatted, there are two aspects: write protection and bad sectors. There might be a physical switch on the USB drive, which is designed to lock the disk. Ensure the switch is placed at the UNLOCK side. If Windows still was unable to format the USB after removing write protection, you can check bad sectors for the disk using DiskGenius.
4. what to do when Windows 10 unable to format SD card?
When Windows 10 cannot complete the format for SD card, you can try force formatting it via Diskpart:
Step 1: Right-click on Start menu and select Windows PowerShell (Admin).
Step 2: Type diskpart and press enter.
Step 3: Type follow commands one by one, and press Enter key after each command.
List volume
Select volume # (replace # with the number of the SD card)
Format fs=FAT32 quick
Conclusion
In the content above, we discussed the error "Windows was unable to complete the format" and provided 7 solutions to fix it. Hope you can get the error fixed for your SD card, USB flash drive, pen drive, hard drive, etc. If your disk still cannot be formatted after trying all these solutions, the disk must be physically damaged. In that case, you can either send the disk to us to recover data or contact its manufacturer to get it repaired. Should you need any help, feel free to leave a comment or email us.
Related guides
- How to Fix "The format did not complete successfully" without data loss?
- How to fix "The file or directory is corrupted and unreadable" error in Windows 10/8/7?
- Solved: The volume does not contain a recognized file system in Windows 10/8/7
- How to fix "Windows was unable to complete the format" error without losing data in Windows 10/8/7?
Thursday, December 21, 2017
How to fix "invalid partition table" error on Windows 10/8/7/XP?
Symptoms of invalid partition table issue
Causes of this Error
- The boot sequence is wrong.
- The BIOS is out-dated.
- There are two or more partitions are marked as active partition on the hard drive.
- MBR (master boot record) is corrupted.
How to fix “invalid partition table” error?
Solution 1: Rebuild the MBR


Solution 2: Rebuild MBR using Command Prompt
Solution 3: Change the boot sequence
Tuesday, July 18, 2017
MBR VS GPT, which one is better for your computer?
MBR Partition Scheme
GPT Partition Scheme
How to choose partition plans between MBR & GPT?
How to convert MBR to GPT without data loss?

